

How To Stop Windows From Scanning And Repairing Drive
How to Gear up "Scanning and Repairing Bulldoze" Mistake in Windows 10
Introduction
A number of Windows ten users take reported that when they kicking their computer it is stuck on "Scanning and Repairing Drive". Almost users also written report that even when they restart, they are returned to the aforementioned screen.
You are probably reading this because your computer is showing this screen now. Exercise not panic. I have the solution for you. Only kickoff, permit me share three reasons why this may happen.
What Does Scanning and Repairing Bulldoze c Mean in Windows 10
There could be a number of reasons why your Windows 10 may exist stuck at "Scanning and Repairing Bulldoze D or C".
I, if you forcefully shutdown your calculator. That is, you did not use the normal shutdown only rather pressed the power button on your computer. This may pb to data abuse. If your Operating System files get corrupt due to forceful shutdown, it may lead to this message.
2, if your hd has some corrupt sectors. That is, some portion of your hd may be bad. This may but happen due to a number of reasons. It may not be related to your forcefully powering off your computer.
Third, if you run CHKDSK /F control while logged on to Windows. When you run this command on drive C from within Windows, you volition receive the error message "Chkdsk cannot run considering the volume is in employ by some other process". You are and then given the option to run Chkdsk on next reboot. When you restart your estimator it volition show "Scanning and Repairing Drive".
How to Stop Scanning and Repairing Bulldoze in Windows ten
At present that you lot know what could cause your Windows 10 computer to be stuck to "Scanning and Repairing Bulldoze", let me show you the solutions.
In that location are 2 steps to set up "Scanning and Repairing Drive" Event on Windows 10″:
- Boot to Safe Mode
- Use one of the listed methods to fix problems with your difficult disk.
Tip
Before you proceed, note the drive letter that shows upwards in "Scanning and Repairing Drive" message.
Step 1: Boot Windows 10 to Safe Style
The fastest fashion to force Windows 10 to boot to rubber mode is to interrupt its boot 3 consecutive times. Follow the steps below to force condom fashion kicking:
- At the "Scanning and Repairing Drive" screen, printing the power push button on your computer for about ten seconds. It volition shutdown.
- Printing the ability push button again to boot the computer. When you come across a sign that Windows is about to boot, press the power push over again to ability it off.
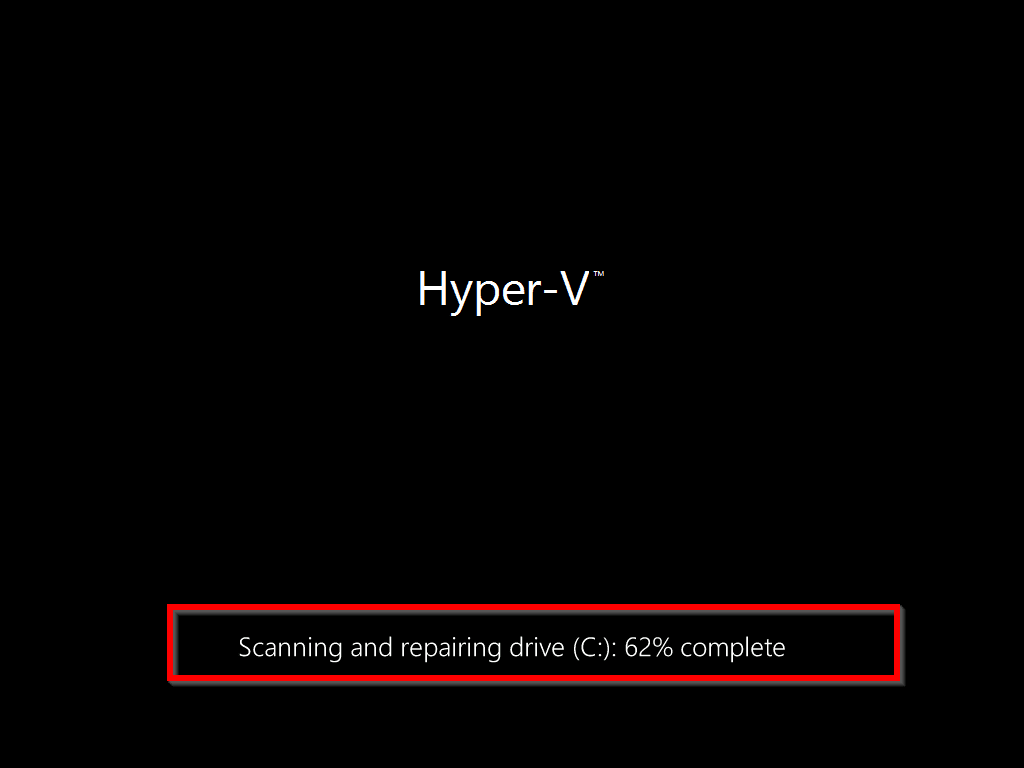
- Repeat the last step for the third time. When you boot again, you volition meet the screen below.

Tip
In the final prototype, mine is displaying Hyper-V. This is because I am using a Microsoft Virtual Car for this demo. Yours volition probable display your computer's manufacturer like HP, Dell, Lenovo, etc.
- And then wait until you see the screen below.

- Click Avant-garde options. Then click Troubleshoot.
Advertisements

- Select Advanced options once again.

- On the next screen, if you lot practice not see Offset-up Settings, click See more recovery options.

- You should at present meet Start-upward Settings. Click information technology.

- Finally, click Restart.

- On the screen similar to the one below, printing F4 on your keyboard to boot to safe mode.

- Your computer will reboot to Windows x logon screen. Logon with your normal account. You are at present in Safe mode. To confirm, the 4 corners of your screen will accept "safe manner". Come across the second image below.


Step ii: Utilize one of the Listed Methods to Fix Issues With Your Bulldoze
In one case you have booted your estimator to safe style, yous have to fix whatever problem with the difficult bulldoze that is making Windows to keep scanning and repairing drive.
Endeavor these methods one at a time. When you try method 1, reboot your computer. Then check whether "Scanning and Repairing Drive" Effect is resolved. If not boot the computer to safe mode again. Then endeavour method 2.
Method 1: Bank check Drive for File Arrangement Errors
- On the left of task bar, right-click Windows logo. Then click Disk Direction.

- When Disk Direction opens, right-click the drive that showed up in "Scanning and Repairing Bulldoze" message. Then select Properties.

- When the Disk Properties opens, click the Tools tab. Then beneath Error checking, click Bank check. Await for the task to complete. Then boot your computer and check whether Windows boots normally.

If the above method does not resolve "Scanning and Repairing Drive" bulletin, attempt method 2 below.
Method 2: Run CHKDSK
The side by side option to fix "Scanning and Repairing Bulldoze" issue is to run a control called CHKDSK. Recently I wrote a guide, 20 Command Prompt Commands for Sys Admins with details of how to use CHKDSK.
To set "Scanning and Repairing Drive" effect with CHKDSK, follow the steps below:
- Still logged on to safe fashion, search cmd, then right-click Control prompt and select Run as Administrator.

- When command prompt loads, enter the command below. Then press Enter central on your keyboard.
CHKDSK /F
- If yous receive the bulletin "Chkdsk cannot run considering the volume is in use past another procedure", enter Y and printing the Enter key. Then reboot your estimator.

When your computer reboots, you lot will even so run into "Scanning and Repairing Bulldoze". Do not panic. This fourth dimension, information technology is the CHKDSK command that initiated the scan. It should scan successfully and boot your figurer normally.
Decision
If your computer is stuck on "scanning and repairing bulldoze" it tin be scary. Hopefully, you have been able to get your computer to boot using ane of the methods suggested in this guide.
I promise you institute this Itechguide helpful.
If yous have questions or comments utilise the "Leave a Reply" grade at the end of this guide. Alternatively, you could share your experience fixing "scanning and repairing drive" on your computer.
Other Helpful Guides
- 20 Command Prompt Commands for Sys Admins
- Windows was Unable to Complete the Format [Resolved]
Additional Resource and References
- Start your PC in safe mode in Windows 10
- viii ways to boot into Windows 10 Prophylactic Style
- CHKDISK Command
- Was this mail service helpful?
- Yes (15)No (0)

Source: https://www.itechguides.com/scanning-and-repairing-drive-windows-10-fixed/
Posted by: mossmangratting43.blogspot.com
0 Response to "How To Stop Windows From Scanning And Repairing Drive"
Post a Comment